Today we look at how to fit a toilet seat cover, mainly made of thermoset, but with the new stainless steel hinges it is also valid for some coated wood models. As we have seen in previous posts modern sanitary ware require toilet seats with fixing from above (also called expansion or top), but the procedure does not change even when fixing from below. Once you have received the toilet seat purchased in the Sintesibagno store/catalogue, you will receive an envelope with two round plates that have a pin where the toilet seat will then be fastened. The first thing to figure out is what type of fixing your toilet seat needs.
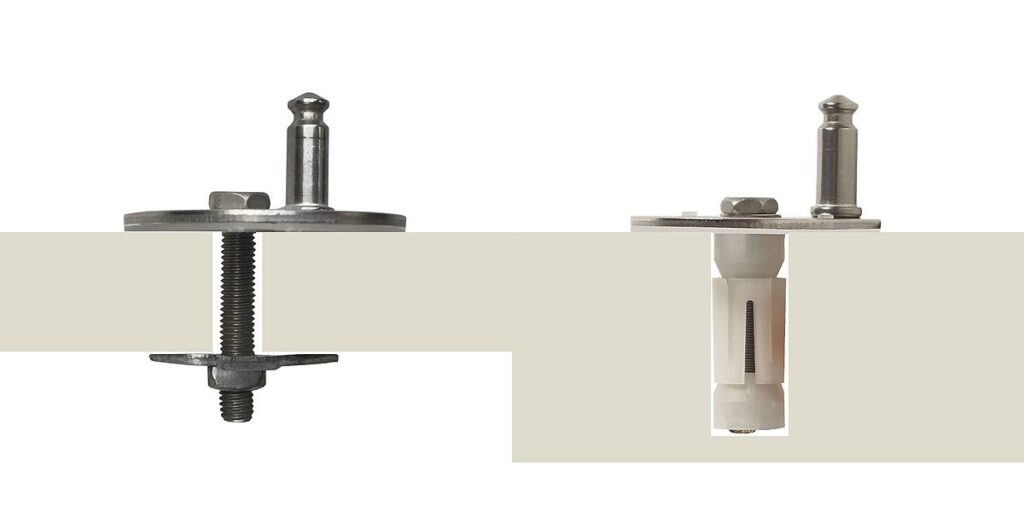
In the following picture you can see the three types of fixing available.
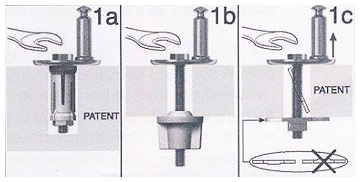
1a fixing from above by means of an expansion bolt; 1b fastening from below by butterfly; 1c fixing from above by means of an anchor/anchor.
Having understood which fastening we will use to secure the discs with the pin (we will see how to mount them later), we begin to see how to position them on the pot and thus enable us to obtain the precise measurements in length and centre distance. THEN the assembly procedure starts by placing the discs with the pin on the vessel (remember to fit the white rubber gasket on the bottom (towards the floor) of the discs which will serve as a mechanical and hydraulic seal). Insert the screw from top to bottom and fit it into the slots/guides of the diskette. If tightening from below (we will also see the most common fixing from above in both dowel and anchor options) at the rear of the toilet seat you will see the two screws sticking out, take the two butterflies and start screwing them upwards almost to the end of the thread – you must not tighten them completely! The upper disc and its pin must be able to move back and forth and be able to rotate 360°, which as we said will allow the toilet seat to have the precise length required and the correct centre distance.
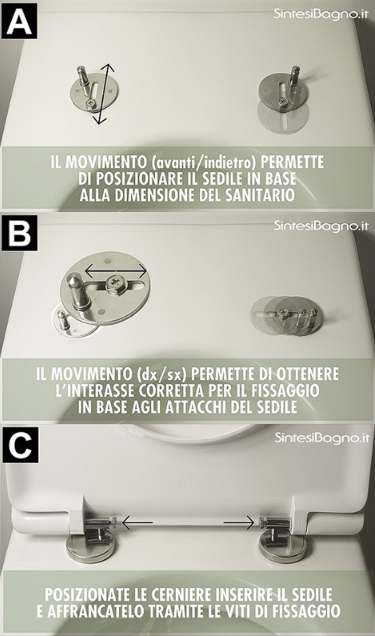
The rotation of the pivot disc allows different lengths and centre distances to the toilet cover.
The small discs with the pin that are attached to the toilet bowl (but not locked as previously mentioned), we now attach (without locking) the toilet seat cover and begin positioning it by means of the toilet bowl guides according to the length of the toilet bowl in front. Having obtained the precise length at the front, we position ourselves behind/underneath the toilet bowl and pull the two butterflies that we had left previously unlocked to the end. Tighten tightly and lock the whole thing. We make a visual check from above, if the toilet seat cover is perfectly aligned with the toilet bowl we are almost at the end. We unhook it from the pins, position the chrome-plated cover caps, re-hook it and with the key (usually supplied) this time tighten it completely to the hinge.
We will do the same in the case of fixing from above with an expansion bolt or anchor. Let us now look at these types of toilet seat fixing.
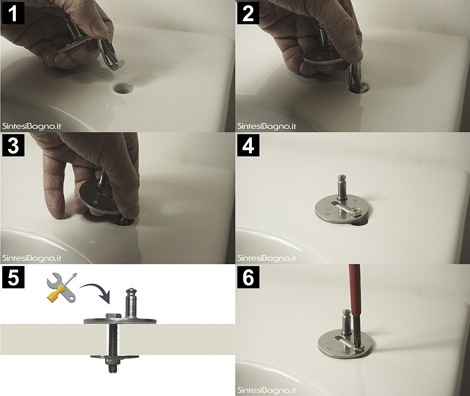
Toilet cover fixing with expansion system (dowel)
The screw is inserted on the disk with the pin where the plastic/thermoset (or coated wood) part will be fixed from above and then the dowel is placed, which may be PVC or even in some cases rubber from below. Once the dowel is in place, the locknut is placed (in some assembly kits (see photo, there are two locknuts) with the conical part towards the dowel so that when we then tighten the screw it will allow expansion. Once assembly is complete, the kit is inserted into the hole in the sanitary fitting. Once the kit has been inserted in the hole, we will position the upper pin so as to obtain the necessary centre-to-centre distance to enter the small cylinders of the WC cover and obtain the correct size of the same (see previous images) for the WC on which we are assembling it. Once the correct position has been found, all that remains is to secure it to the toilet bowl by simply expanding the dowel with a screwdriver, clearly from above. As with fixing from below, we make a visual check from above, if the toilet seat is perfectly aligned with the toilet bowl we are almost at the end. We unhook it from the pins, we place the chrome cover caps in place, re-attach it and with the key (usually supplied) this time fully tighten it to the hinge.
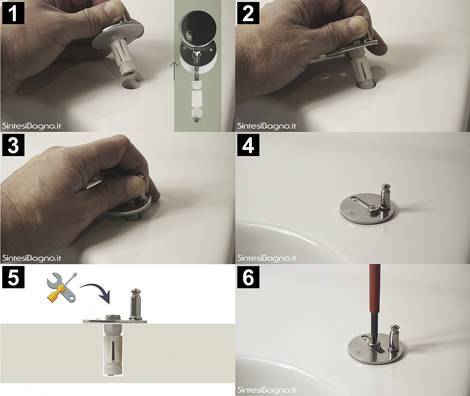
Toilet cover fixing with anchor system (lozenge)
To close the discussion on fixing from above the toilet seats, let us talk about the latest version introduced for fixing from above (in the picture at the beginning of the post shown 1c). It is called anchor fixing. It is a significant improvement on the dowel expansion fixing. In fact, the latter is sometimes difficult to expand (partly because the hole in the ceramic is too big) or if it does expand, it often loosens up as the weeks go by and you have to constantly re-tighten it. This new system in its simplicity is very efficient. What is clear is that the hole in the sanitary ware must be through, if the hole is closed (blind) one must continue to use the dowel hole. Let us also see here the procedure for fitting the toilet seat cover. In this case too, we insert the screw on the small disc with a dowel where we will then fix the plastic/thermosetting part (or coated wood) from above and then from below we insert the metal element made in the shape of a rhombus/losange and screw on the nut supplied. Having done this, we insert the screw with the elements just described into the hole of the pot, holding them vertically. Once the ceramic thickness has been passed, the rhombus element will be positioned horizontally. Once the kit has been inserted into the hole, we will position the upper pin so as to obtain the necessary centre-to-centre distance to enter the cylinders of the toilet seat and obtain the correct toilet seat size (see previous photos) for the toilet bowl on which we are fitting it. Once the correct position has been found, all that remains is to lock it onto the toilet bowl simply by holding the screw upwards from above and turning it, the fixing will “anchor” and lock the toilet bowl cover in a stable and durable manner. We do a visual check from above, if the toilet seat is perfectly aligned with the toilet bowl we are almost at the end. We unhook it from the pins, position the chrome-plated cover caps, re-hook it and with the key (usually supplied) this time tighten it completely to the hinge.